Learn how to DIY flower garland for your chandelier to makes a fabulous centerpiece alternative. Perfect for a special occasion.

How to DIY Flower Garland for Your Chandelier

WRITTEN BY:

SHARE

DIY

SARAH PETERSON

MORE about me

Being a work-from-home mama has required me to become a next-level planner and productivity nerd. I share digital and printable resources custom-designed to run my life, hoping they will help you run your life, too.

free digital planners

Digital Planner for iPad 

Digital Bullet Journal

Digital Memory Planner

LOVING

What I'm 

Right Now

HEY, I'M SARAH!

ochid iPad case with pencil holder

Bandolier crossbody phone case + wallet 

POP Keys Mechanical Wireless Keyboard

magnetic rotating  iPad stand

free printables

Super Cute Daily Planner

Weekly Planner Printable

Printable Planner Stickers

Printable Daily Planner

Wall Art Printable

Brain Dump Printable

Digital Notebook

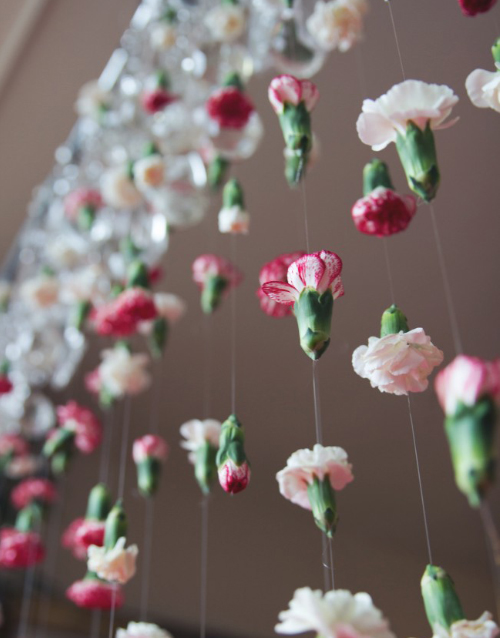
Want to create a DIY flower garland for your next special occasion?

I assembled a different kind of "centerpiece” for my family's Christmas dinner this year. This project is really easy to do with just a few supplies and fresh, dried, or faux flowers.

Read on to learn how!

diy flower garland

SUPPLIES YOU NEED

  • Flowers (You could use fresh, dried, or faux. I used fresh carnations.)
  • Fishing line
  • Needle
  • Scissors
diy flower garland

DIY FLOWER GARLAND INSTRUCTIONS

  1. Trim the flowers off the steams so you are left with just the flower heads.
  2. Tie a knotted loop at one end of a long piece of fishing line.
  3. With your needle, thread the line and sew through the flower whichever way you’d like it to hang (upside-down, right-side up, on its side).
  4. Leave some space and tie another knotted loop and add another flower.
  5. I did 12 four foot long strands of about 10 flowers and then laid the middle of the strand over our chandelier so about 6' of garland fell on either side of the chandelier.
  6. Keep in mind that if you lay the strand across something, one half of the strand will need their knotted loops on the other side of the flower head.
  7. Trim any ends that are too long or any loops that are too big.
diy flower garland
diy flower garland
diy flower garland
diy flower garland
diy flower garland
diy flower garland
diy flower garland

MORE POSTS YOU'LL LOVE

This post may contain affiliate links, which means I'll receive a small commission if you purchase through my link. Please read full disclosure here.

LAST UPDATED:

Filed in:

October 8, 2023

Downloaded over 100,000 times! GET ACCESS NOW!

Free PrintableS

READ THE LATEST
Hey, I'm Sarah!

Designer, DIYer, & Deep Googler

I've always been infinitely curious on how the things I love are created. Whether it's a soap recipe, a beautiful piece of jewelry, or a jaw-drooping, drool-worthy interior... I have an persistent need to figure it out... and do it myself!

Learn more about me