


So you want to make your own wedding dress? I'm glad you've come upon this post because I have a lot of tips to share from making my own wedding dress for our 2020 Blue Moon Halloween wedding.
Custom-making a wedding dress is not for everyone, but in the end, it will feel so special to walk down the aisle wearing something you created with your own two loving hands. I don't regret the many hours I spent hand-making my dress, and neither will you!
11 MUST-KNOW TIPS TO MAKE YOUR OWN WEDDING DRESS
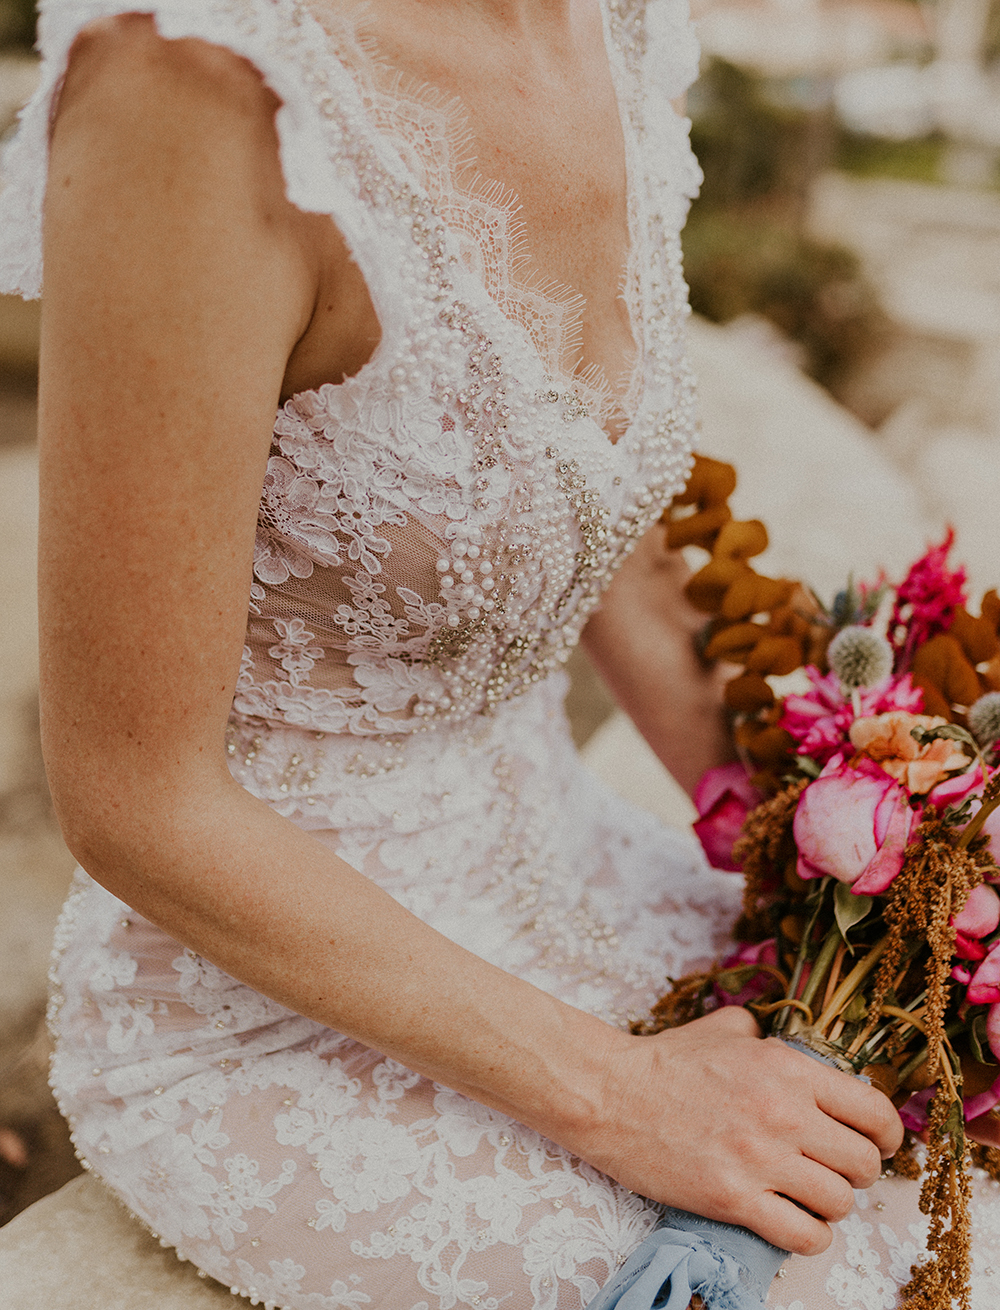
All bridal photos by Lauren Turner Photography.

Give YOURSELF AMPLE TIME TO MAKE YOUR DRESS
Like many creative endeavors, making your wedding dress will take longer than you think it will take. A lot will depend on your sewing level, access to materials, the certainty of your creative vision, and dress style.
I gave myself three months to make my dream dress, all while also working and planning/DIYing the other parts of our wedding. I started in early August for an October 31st wedding. Unfortunately, I experimented with materials and patterns in August, so I only started on the final dress in September.
Looking back, I wish I had started at the beginning of the year. It would have given me ten full months to make my dress.
It would have taken a lot of pressure off, and having the dress complete a month (or even a week) before the wedding would have been such a great gift!
We weren't sure of our wedding plan until the summer (because of COVID), so I was holding off on the dress until I knew where the wedding would be. In hindsight, please don't wait as I did, you know you're going to wear a wedding dress. The sooner you start, the better!
DRESS DETAILS THAT TAKE LONGER THAN YOU EXPECT
- sourcing the perfect fabric(s)
- perfecting your pattern
- seam-ripping large areas or other repairs
- scratching your design and completely starting over
- hand-sewing details like embellishing or embroidery
- finishing the inside of the dress
- hemming an extra long train
- making additional accessories (veil, clutch, hair combs, etc)

Choose HIGH-QUALITY MATERIALS AND FABRICS
A lot of brides make their dresses to save money. I get it; your wedding dress can be one of the most expensive things at your wedding!
A few store-bought dresses that fit me cost around $2,000. (I'm tall and anything below that price point was usually too short on me.) So if I made my dress, I figured it would be a small fraction of that!
And so I first experimented with some (really awful, stiff, cheap) polka dot tulle. I planned to make the design so good that no one would notice the tulle was not the most luxurious option. Wrong!
No matter what I altered or how I styled it, it looked cheap—because it was.
I found my final fabrics at Mood Fabrics in Los Angeles. I spent an average of $150/yard for the lace fabric and the crystal and pearl embellished overlay fabric. It was a lot more than I've ever spent on materials. But in the end, I still paid less than I would have if I had purchased a store-bought dress.
The total fabric cost for my dress was around $1200.
REASONS TO CHOOSE NATURAL FABRIC Over SYNTHETIC
- natural fabrics are more breathable (moisture-wicking capabilities allow ventilation so that you won't feel sweaty on your wedding day)
- natural fabrics drape better on your body
- natural fabrics are less apt to cause a rash or skin irritation
- bonus: natural fabrics are better for the planet


START WITH AN EXISTING DRESS PATTERN
Unless you have experience in pattern-making, I suggest customizing your wedding dress from an existing pattern.
Creating an original pattern is a project in itself and will add a lot of hours of work to the making of your dress.
Instead, find a pattern with the silhouette and neckline you desire. Then trace it onto some pattern paper and make tweaks or enhancements to the pattern paper.
This way, if you have to start over, you always have the pattern base as a starting point (instead of a roll of blank pattern paper!).
You can buy a pattern based on your specific measurements. Plus, it's easy to lengthen or shorten it if you are not average height.
I made my dress pattern from scratch. (Shout-out to my post-grad years at the Fashion Institute of Technology). It had been about 15 years since drafting an original pattern, and it added many weeks to the dress project for me. So please don't do what I did; find an existing pattern first!
WEDDING DRESS PATTERN IDEAS


GO with A comfortABLE STYLE FOR YOUR BIG DAY
When you feel good, you look good, so by all means, design a dress that is comfortable to wear!
Pull out all your favorite dresses in your existing wardrobe and note what you love about each one.
Are there many that you own with the same neckline or overall shape? Maybe all your favorites have capped sleeves? If you own zero body-con style dresses, opt not to make your wedding dress in that style, it probably won't be comfortable for you.
Resist the urge to go with what is trending. Instead, go with what you know looks and feels good, and you won't have any regrets.

Expect some TOTAL DRESS do-overs
Unless you are a wedding-dress maker or seamstress, chances are you haven't made a lot of wedding dresses before.
You might start with one vision, but the vision might change a little or a lot as you get going. For example, maybe executing your idea is more complicated than expected, or maybe after trying something on, you decide to change the silhouette or fit of the dress. That's OK!
Be open to the fact that you might scrap your initial idea and go in a different direction. (This is why tip #1, give yourself ample time, is so important!)
I had three total do-overs. Each one was stressful, and I don't recommend doing it this way. But I knew each version I abandoned was getting me closer to my dream dress.
Please don't freak out if you have to start your dress over. It's going to be OK.


Be sure you can walk in your custom WEDDING DRESS
It's an easy mistake to try on your dress to see how it fits but neglect to take a walk in it. Be sure each time you try on the dress, you're wearing the shoes you plan to wear on the big day, and you take a spin around the room.
Embellished fabrics are heavy and much harder to walk in! Longer trains take some adjusting, so practice, practice, practice! Also, when you walk down the aisle, you will likely carry a bouquet, so you should be able to walk in your dress without lifting it with each step.

PROTECT THE HANDMADE DRESS AT ALL COSTS
Warning: you'll work with sharp needles, scissors, and pins, so you're bound to poke or cut a finger or two.
I'm guessing you're NOT going for a blood-stained handmade wedding dress look. So be *extra* careful that your dress-making battle wounds don't stain your work.
For the same reason, you'll also want to be sure your space is free of food, drink, pens/markers, or anything that could accidentally leave an unwanted mark on your dress.
Always ensure your hands are sparkly clean when you begin working on your dress!
Store your dress in a garment bag in between work sessions. Weird things can (and will) happen when you're away.
Thimbles

sewing gloves

garment bag


EXPECT SoME DRESS-MAKING TEARS
Hand-making your wedding dress will be an emotional experience. There are highs and lows you'll go through. Expect that you'll feel euphoric at times, and at other times you'll feel overwhelmed.
I burst into tears when I saw my husband at our first look. Of course, a big part of it was I was so happy that we were about to become husband and wife. I know another part of my emotional reaction was seeing him in his wedding suit and tie at the church meant I had completed my dress-making mission.

Don't be afraid to bring in a SEWING professional
There is no shame in getting to a certain point with your dress and then taking it to a professional sewist to make complex alterations or finish tedious hand-sewn details. Please heed this advice, especially if you're under time constraints.
The most important thing is that you have a finished dress to wear on your wedding day. So do what you have to do to get it done!
Despite being stressed with time, I refused to enlist anyone's help with my dress. Looking back, I could have gotten much more sleep the week of my wedding if I had asked for help. But unfortunately, my DIY pride got in the way. Don't let that happen to you.

Bring DRESS reINFORCEMENT ON THE BIG DAY
You don't know how your dress will behave on your wedding day, so it helps to consider every possible thing that might go astray.
Please don't assume that because you made the dress, it will cooperate when you put it on. Buttons pop off, seams open, undergarments disappoint, and static cling takes over.
Have a backup bag that includes all the emergency items that might save the day.
Items for WeDDING dress reinforcement
- sewing kit (make sure it includes the right color thread to match your dress)
- safety pins (small, medium, and large)
- fashion tape
- dress weights (in case it's windy)
- stain remover
- scissors
- multiple bra options
- multiple shape-wear options
- lint roller
- static guard
SEWING KIT

FASHION TAPE

DRESS WEIGHTS


LIMIT THE DIY FOR THE REST OF THE WEDDING
Making your dress will require more time, effort, patience, and persistence than you expect. There were moments when I was making mine that I said to myself it would be the last thing I'd ever make (while shaking my fist!).
If you're considering making your dress, chances are you're the crafty type like me and are excited about all the DIY opportunity that comes with throwing a wedding.
I recommend limiting the other wedding DIY projects you take on in conjunction with making your dream dress.
While I definitely don't regret DIYing our entire wedding, and I would do it all again the same way, my recommendation to others is always to take on less yourself and outsource more.

This post was all about tips on MAKING A HANDMADE WEDDING DRESS.
I hope these tips help you make your own wedding dress a beautiful dream come true.
This post may contain affiliate links, which means I'll receive a small commission if you purchase through my link. Please read full disclosure here.