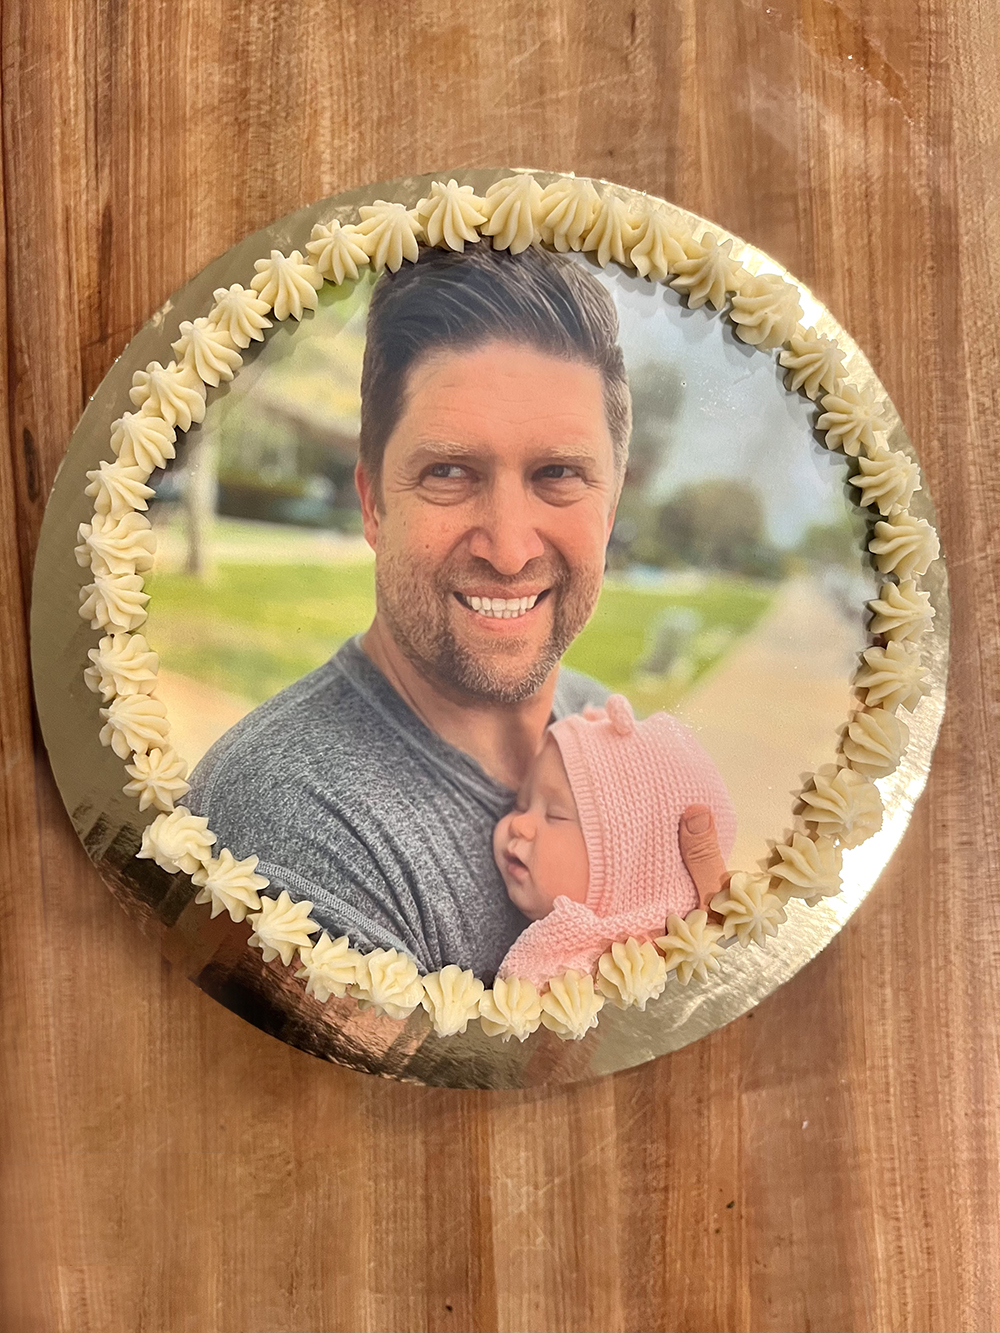


I wanted to put my husband's picture on a cake for his first Father's Day. He is a GREAT father in so many ways, but he is very hard to surprise.
I figured he would probably not expect his face on a cake and that it would certainly make him smile.
You too can put a picture on a cake with a few simple materials; it's extremely easy.
Read on to learn everything you need to know about putting a picture on a cake – from selecting an image to the finishing touches.
Get ready to make a cake that your loved ones will remember forever!
THIS POST IS ALL ABOUT HOW TO PUT A PICTURE ON A CAKE.


Choose an image that works with the size and shape of your cakE
First and foremost, consider the size and shape of your cake and select an image that will fit well.
I knew my cake would be 8" round, so I went through my camera roll and looked for a photo where my husband's and daughter's face would fit into a circle.
You want to select an image that not only has the correct orientation and framing but also:
- make sure the photo is well-lit; dark, blurry photos won't look great on your cake
- check that the background doesn't include distracting or inappropriate details
- choose an image with negative space if you want to add a message
PREPARE YOUR IMAGE
Here are things to consider when preparing your image for printing:
- crop your photo to the correct size and shape
- add messaging you want to include, for example, "Happy Father's Day"
- ensure the image is a large size and high resolution for top-quality printing
- edit your image
- enhance colors
- clip out objects
- remove unwanted elements from the image
All of the above items are easily accomplished in the free version of Canva or Photoshop.
CHOOSE A VENDOR TO PRINT YOUR IMAGE
I used this company to print my image for my cake. With shipping, it cost me $16.24. I sent them my photo with my order number immediately after purchasing. It arrived two days later. (Shipping times may vary depending on your location.)
MAKE YOUR CAKE
Make whatever kind of cake you wish! There is no limit to what type of cake you put your edible image on; it works on all types:
- sheet cake
- round cakes
- multi-layer cakes
- cupcakes
I made a two-layer 8" round vanilla cake. I frosted the top and sides of the cake with homemade buttercream frosting before I applied the image.
Be sure to save the piping decorations until after you apply the image.
HOW TO APPLY THE IMAGE TO THE CAKE
Your printed edible photo can be applied to almost any icing, such as fondant, sugar paste, royal icing, buttercream, or glaze icing.
Make a backing plaque from fondant or sugar paste if you have wet icing or a cake covering with a high-fat content (such as cream cheese). The plaque should be the same size and shape as your edible photo. Place the image on the plaque and then apply it to your cake.
1. How to Store your Edible Photo
- Do not refrigerate your edible image.
- Keep inside the sealed bag it arrives in at room temperature.
- Do not expose to light to preserve the color vibrancy (until ready to apply to a frosted cake).
2. Prepare Your Edible Photo
Keep your edible photo in its plastic bag until you are ready to use it. Take it out of the bag before applying it to the cake to allow time for it to dry out slightly. Doing this will make it easier to peel from the backing sheet.
3. Remove Your Edible Photo from the Baking Sheet
The edible photo should peel off easily - don't force it if it is sticking to the backing sheet; this is probably due to the temperature and humidity in the room.
IF THE IMAGE DOES NOT PEEL EASILY FROM THE BACKING SHEET:
The humidity may be so high that the frosting sheets will not quickly release from the paper or come apart in small pieces. In these conditions, the following methods will help:
- Place the frosting sheet into a cold freezer for 10 to 15 seconds (not longer). Remove the sheet immediately after taking it out from the freezer, or
- Use a hairdryer (or any other hot air supply) on the front and reverse sides of the backing sheet on high hot for 30-40 seconds.
- Place in a warm, dry oven at a low temperature for about 1-2 minutes, or lay the sheet on a warm pan for a minute or two.
- Pull the backing sheet over the sharp edge of a tabletop.
Remember, the frosting sheets will not quickly come off the backing sheet because the frosting sheet is still wet. The image will release once it's dry!
4. Apply Your Edible Photo
If you have a store-bought cake or the icing on your cake has dried or formed a crust, moisture will help the photo attach to the icing and blend in. Dampen the cake icing using a pastry brush or a fine mist/spray, but don't over-wet it.
Do not wet the photo! Doing so may cause the colors in the image to run.
First, hold the photo gently at the edges and place the middle onto the cake. If any bubbles or wrinkles appear, gently pat them out with dry fingers.
If you accidentally tear the icing, don't panic! Just rub very gently with a dry finger; it will merge back together, and the tear will disappear after an hour or so.
ICE CREAM
For ice cream cake iced with a non-dairy whipped topping, do not add any additional water.
If you apply directly to ice cream, it is best to allow it to "sweat" a bit before applying the image or mist the ice cream with milk before applying the image.
And finally, if you are working with soft-serve ice cream, you will achieve better results by applying the edible image while the ice cream is soft, then freezing it hard.
FROZEN CAKES
Thaw slightly before icing to avoid cracking, then apply the image.
If the decorated cake is frozen, thaw it slowly, preferably in a refrigerator, uncovered, to avoid running of colors and sweating.
5. ADD FINISHING TOUCHES TO YOUR CAKE
After a few hours, your picture will blend into the icing and look like it is painted onto the icing—the time this takes and the results will vary depending on how dry your icing is.
If you have used a very dry topping or need to serve the cake straight away, pipe some icing around the image to hide any visible edges.
It was my first time piping frosting, but these tools made it very easy!


Love this idea for your next special occasion? You might also like:
MORE POSTS YOU'LL LOVE
This post may contain affiliate links, which means I'll receive a small commission if you purchase through my link. Please read full disclosure here.